Installation Via WordPress Admin area
- Log into your WordPress admin area.
- Go to Dashboard >> Appearance >> Themes.
- Click on Add New Theme button at top.

- Now, Hit Upload Theme button at top and upload.
- Click on Activate once upload has finished.
Installation Using FTP
- Download mitco-tech.zip
- Extract Zip file.
- Using your FTP program, upload the non-zipped theme folder into the “/wp-content/themes/” folder on your server.
- Go to Dashboard » Appearance » Themes and find Mitco Tech theme from list
- Click on Activate to active Mitco Tech theme
How to Import Demo Data ?
- DesignHubs Ecommerce Theme Install after admin notice to call
- Get Started on click Import Demo Data.

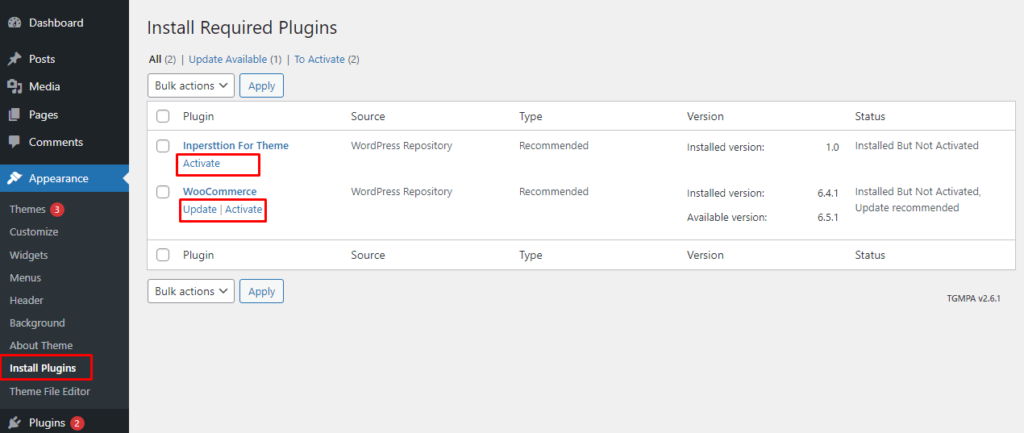
How to Install Recommended Plugin?
- Go to Appearance> Install Plugins.
- Click Install to install the plugins.
- Click Activate to activate the plugins.
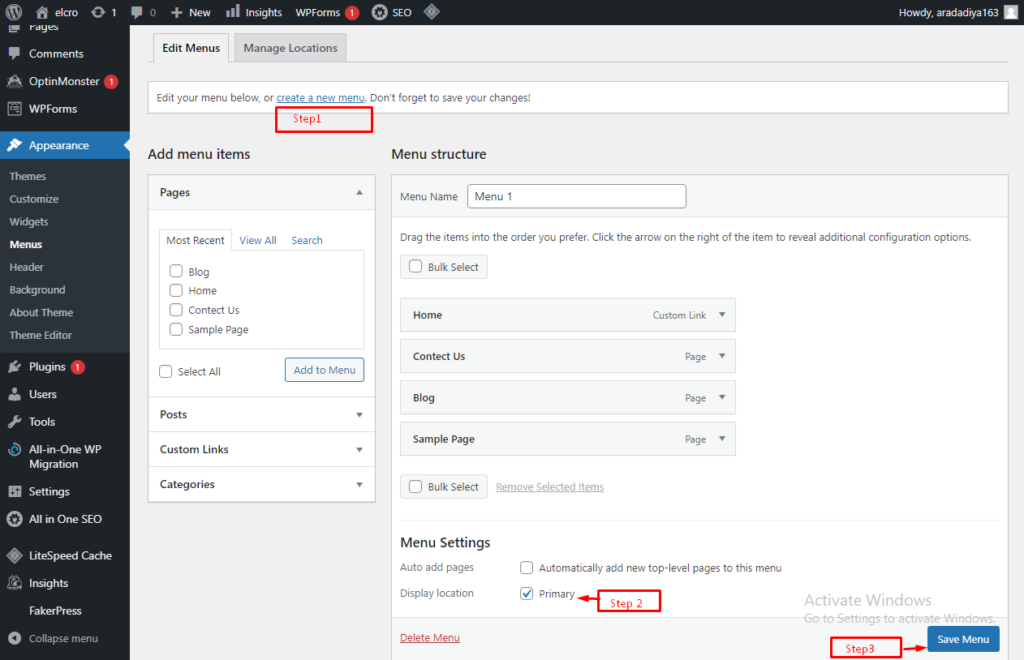
Create a new menu
- Go to Dashboard >> Appearance >> Menus.
- Click on create a new menu as show in below image.
- Enter menu name and click on Create Menu as shown in below image.
Header Settings
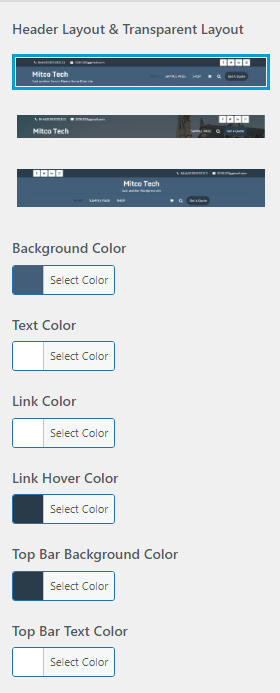
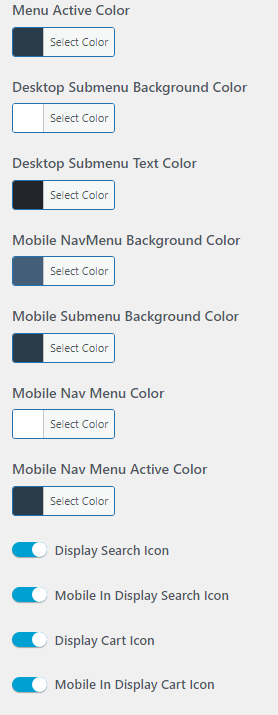
Step 1. Go to Dashboard >> Appearance >> Customize >> Header >> Header Option
- Select Header Layout
- Select Topbar-Background color, TopBar-Text color, Background Color, Text Color, Link color and Link hover Color
- checked Header Serch Icon
- Select Transparent Header Select in Background color, Text color and Link Color.
- select menu color, submenu color mobile in submenu color and link color
- Display Desktop and Mobile cart and search icon
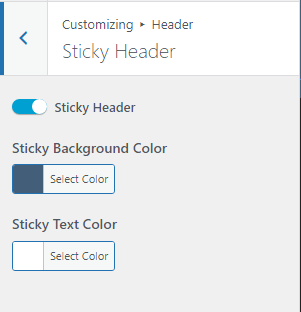
Step 2. Go to Dashboard >> Appearance >> Customize >> Header >> Sticky Header
- Checked sticky Header
- Select Sticky Background Color
NOTE : Free Version in sticky header is not allowed and Pro Version in Sticky header is allowed.
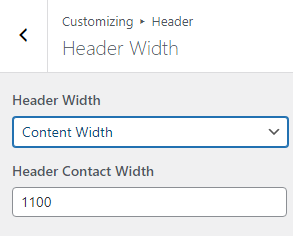
Step 3. Go to Dashboard >> Appearance >> Customize >> Header >> Header Width
- Header Width Layout in select Full Width or Content Width.
- Add Header Contact Width
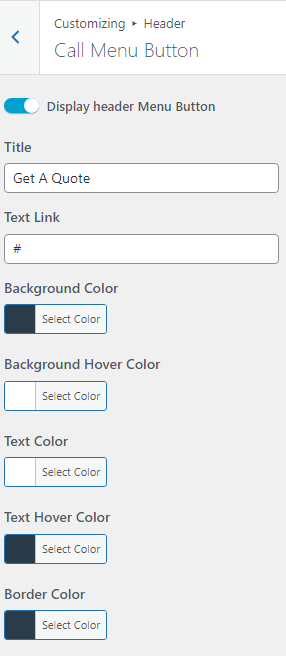
Step 4. Go to Dashboard >> Appearance >> Customize >> Header >> Call Menu Button.
- Checked a Header Menu button.
- Add Menu Button Title and Link.
- Select Background Color and Background Hover Color
- Select Text Color, Text Hover Color and Border Color.
Top Bar Section
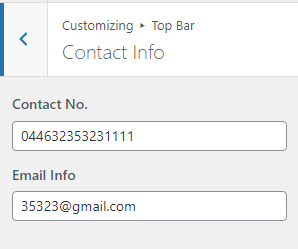
Step 1. Go to Dashboard >> Appearance >> Customize >> Top Bar >> Contact Info.
- add Contact Number and Email id
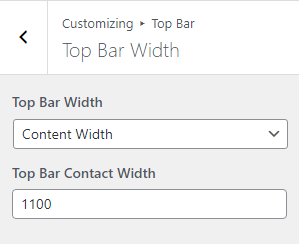
Step 2. Go to Dashboard >> Appearance >> Customize >> Top Bar >> Top Bar Width
- Top Bar Width Layout in select Full Width and Content Width.
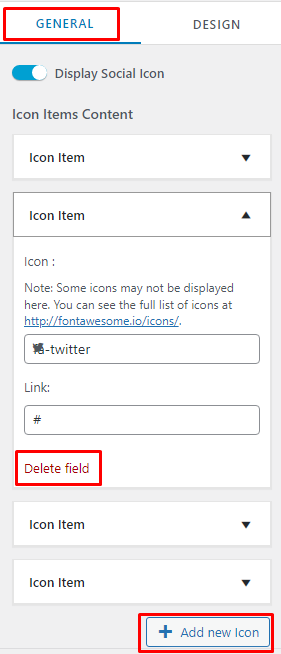
Step 3. Go to Dashboard >> Appearance >> Customize >> Top Bar >> Social Info.
Note : if this plugin Inpersttion For Theme must be installed then this Social Info use Otherwise this Social Info is not work.
- Select General Option
- Checked Social Icon.
- Add New Icon fields.
- Delete Icon fields.
- This Icon Item is Draggable.
- Add Icon and Icon Link.
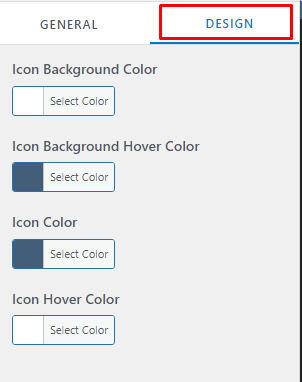
- Select Design Option
- Select Icon Background and Background Hover color.
- Select Icon Color and Icon Hover Color.
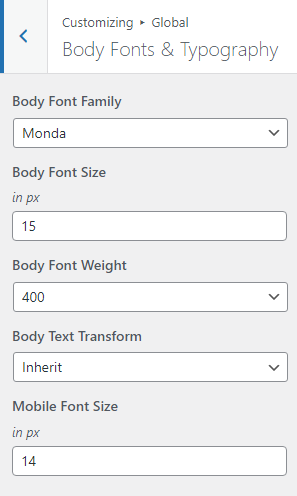
Typography
Step1. Go to Dashboard >> Appearance >> customize >> Global >> Body Fonts & Typography.
- Select Body font family, font weight and text transform
- Add Font Size
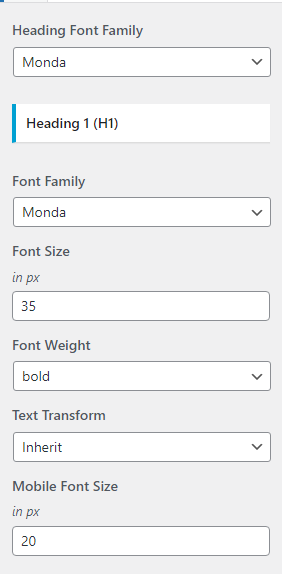
Step2. Go to Dashboard >> Appearance >> customize >> Global >> Heading Fonts & Typography.
- Select Heading Font Family
Heading 1 (H1)
- Select Font Family, Font Weight and Text Transform
- Add Font Size.
NOTE : Free Version in 5 font-family and Pro Version in multiple font-family.
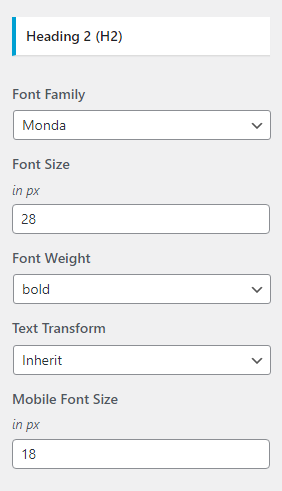
Heading 2 (H2)
- Select Font Family, Font Weight and Text Transform
- Add Font Size.
NOTE : Free Version in 5 font-family and Pro Version in multiple font-family.
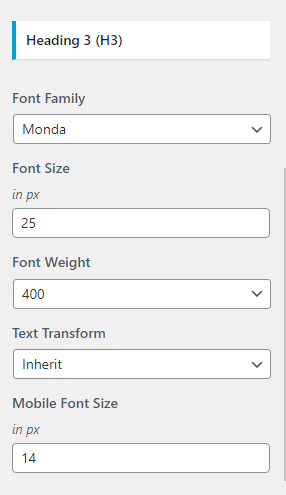
Heading 3 (H3)
- Select Font Family, Font Weight and Text Transform
- Add Font Size.
NOTE : Free Version in 5 font-family and Pro Version in multiple font-family.
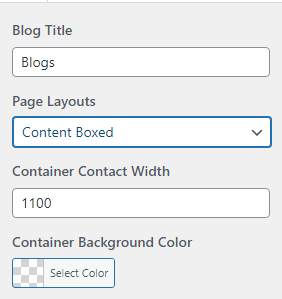
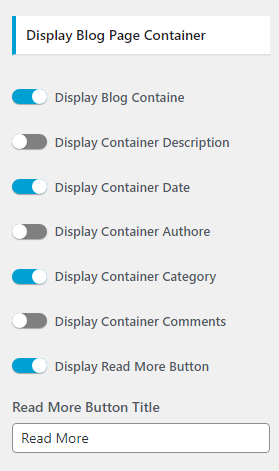
Container Setting
Step 1. Go to Dashboard >> Appearance >> customize >> Global >> Container.
- Add Blog Title.
- Add Container Width.
- Add Container Background Color.
- Select Page Layout in Full Width, Boxed Layout and Content Boxed.
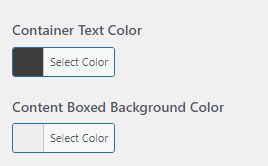
2. Select Page Layout in Content Box Layout
- Select Content Boxed Background Color
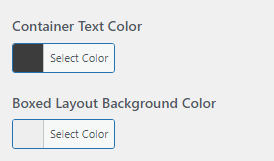
3. Select Page Layout in Boxed Layout
- Select Boxed Background Color
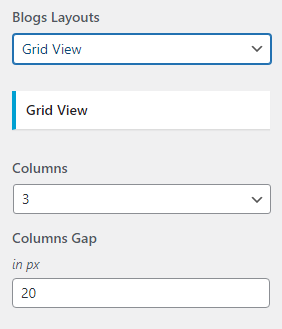
4. Select Blogs Layouts in List View and Grid View
5. Select Grid View Layout and GridView Columns and gap.
6. Display Container
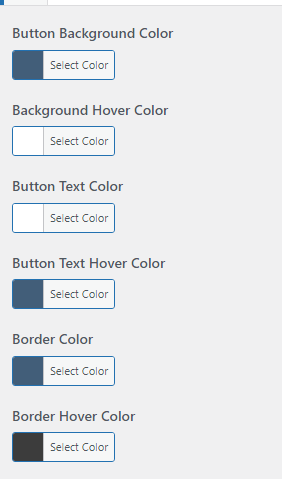
Buttons
Step 1. Go to Dashboard >> Appearance >> customize >> Global >> Buttons.
- Select Button Background Color, Background Hover color.
- Select Button Text Color and Text Hover color.
- Selcect Button Border Color and Border Hover Color.
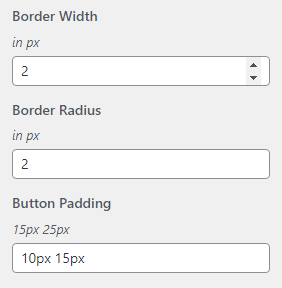
- Select Border Width.
- Select Border Redius.
- please add Button Padding.
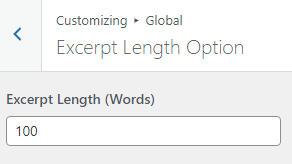
Excerpt Options
Step 1. Go to Dashboard >> Appearance >> customize >> Global >> Excerpt Options.
- add Excerpt Length
NOTE : Free Version in Excerpt Length is not allowed and Pro Version in Excerpt Length is allowed.
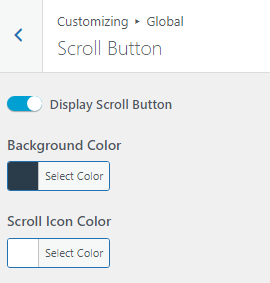
Scroll Button
Step 1. Go to Dashboard >> Appearance >> customize >> Global >> Scroll Button.
- checked Scroll Button
- Select Scroll Background and Icon color
SideBar Settings
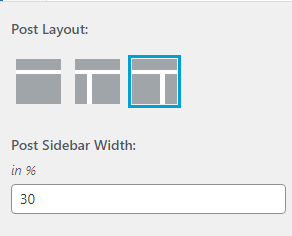
Step 1. Go to Dashboard >> Appearance >> customize >> Sidebar.
- Select Post type.
- Select Layout in no sidebar or Left Sidebar or Right Sidebar.
- Add Sidebar Width.
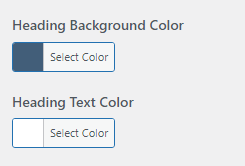
Step 2. Go to Dashboard >> Appearance >> customize >> Sidebar >> Design
- Select Heading Background Color
- Select Headind Text Color.
Breadcrumb Section
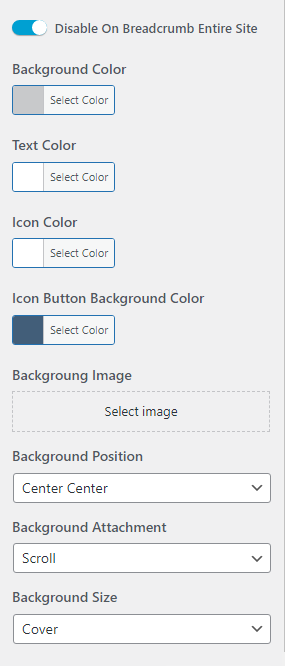
Step 1. Go to Dashboard >> Appearance >> customize >> Theme Option >> Breadcrumb Section
- Checked Breadcrumb entire site.
- Select Background color, Text color and Icon Color and Icon Background Color.
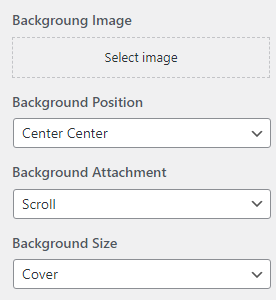
- Select Background Image.
- Select Background Position.
- Select background Attachment.
- Select Background Size.
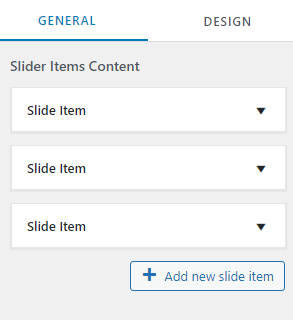
Featured Slider
Note : if this plugin Inpersttion For Theme must be installed then this Slider use Otherwise this Slider is not work.
Step 1. Go to Dashboard >> Appearance >> customize >> Theme Option >> Featured Slider
- Select General Option and Design Option.
- This Section is Draggable.
- Add New Slide Item
NOTE : Free Version in No. of Slide Maximum 1 and Pro Version in Multiple No. of Slides.
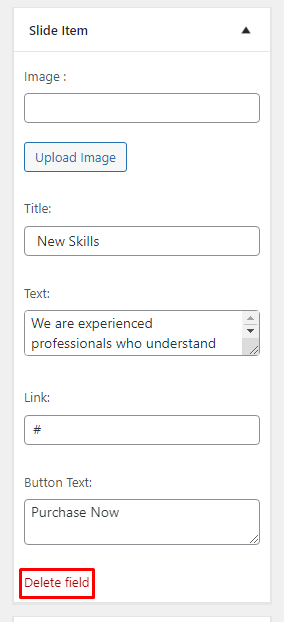
Slide Item
- Add Image Url.
- Add Slider title and description.
- Add Button Text and button Link.
- Delete on click Slide Item is remove.
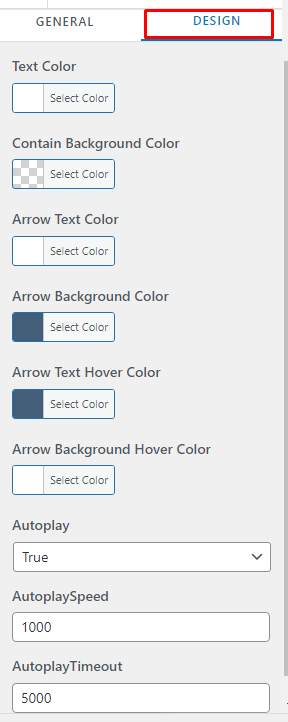
- Select Text Color.
- Select Arrow Text color and Background Color.
- Select Arrow Text Hover color and Background Hover color.
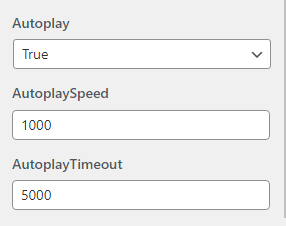
- Select Auto Play.
- Add AutPlay Speed and Autoplay Timeout.
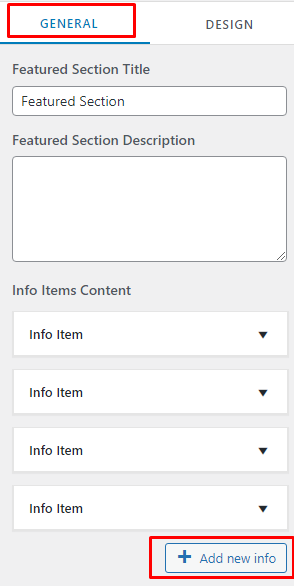
Featured Section
Note : if this plugin Inpersttion For Theme must be installed then this Featured Section use Otherwise this Featured Section is not work.
Step 1. Go to Dashboard >> Appearance >> customize >> Theme Option >> Featured Section
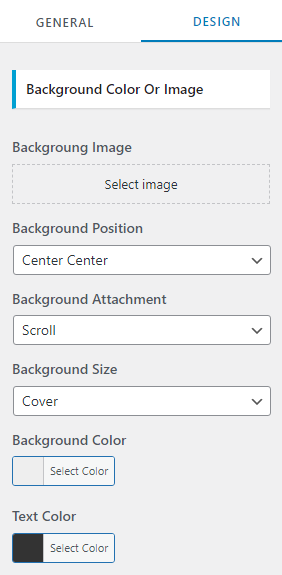
- Select General Option and Design Option.
- Add Featured Section Title and Description.
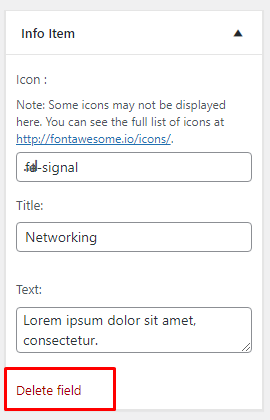
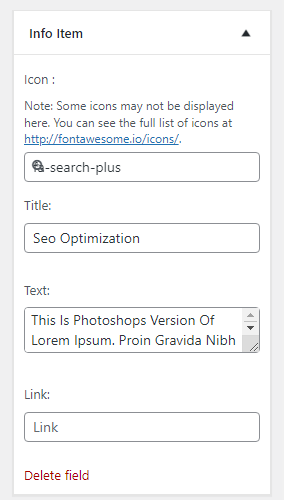
- This Info Item is draggable.
- Add New Info on click add Info Item.
- Add Info Ieam in icon, title, description.
- Delete field on click Info Item is delete.
NOTE : Free Version in No. of section Maximum 3 and Pro Version in Multiple No. of Section.
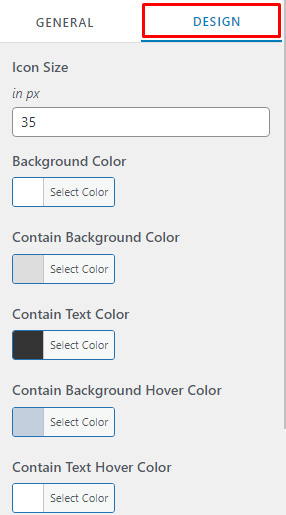
- Select Icon Size.
- Select Background Color.
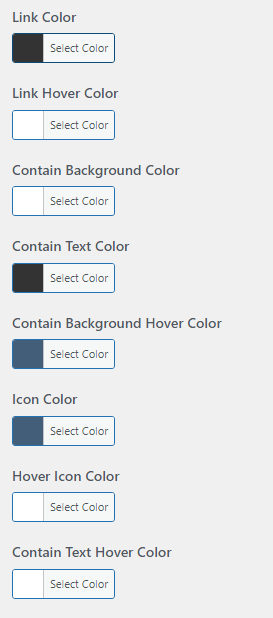
- Select Contain Background color, Background Hover Color.
- Select Contain Text Color, Text Hover Color.
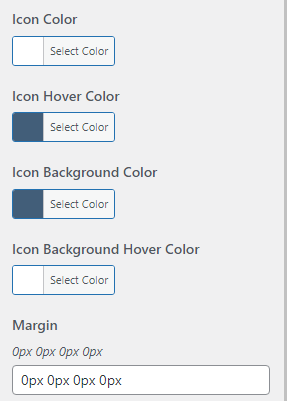
- Select Icon color and Icon Hover color.
- Select Icon Background color, Background Hover Color.
- Add Margin.
About Section
Note : if this plugin Inpersttion For Theme must be installed then this about Section use Otherwise this about Section is not work.
Step 1. Go to Dashboard >> Appearance >> customize >> Theme Option >> About Section
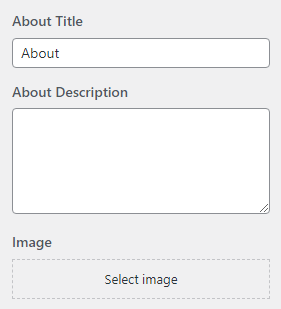
- Add About Title and Description.
- Select About Image.
- Select About Layout 2
- This about Item is Draggable
- Add new About Item and Delete About Item
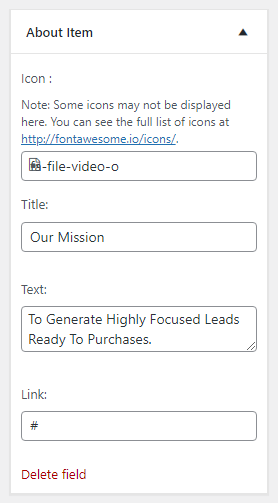
- Select Icon, Title, Description and Link.

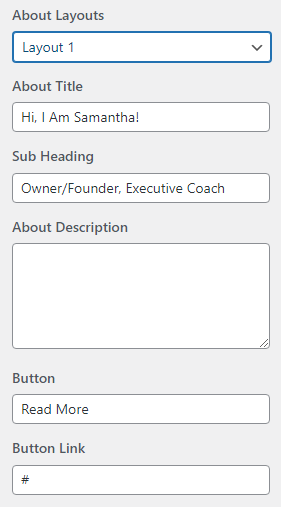
- Select About Layout 1.
- Add Title, Sub heading, Description, button and button link.
- Select Background Color, Text Color, Link Color and Link Hover Color.

Our Portfolio
Note : if this plugin Inpersttion For Theme must be installed then this portfolio Section use Otherwise this portfolio Section is not work.
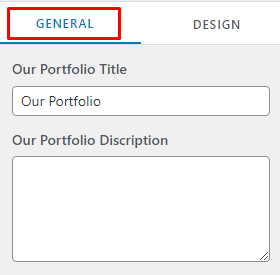
Step 1. Go to Dashboard >> Appearance >> customize >> Theme Option >> Our Portfolio
- Select General Option and Design Option.
- Add Our Portfolio Title and Discription.
- NOTE : Free Version in No. of section Maximum 3 and Pro Version in Multiple No. of Section.
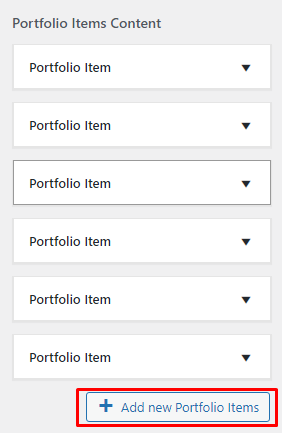
- Add New Portfolio Item and Delete Portfolio Item.
- This Section is Draggable.
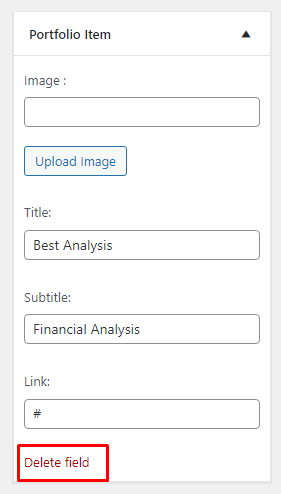
- Select Portfolio Item Image, Title, Subtitle and link.
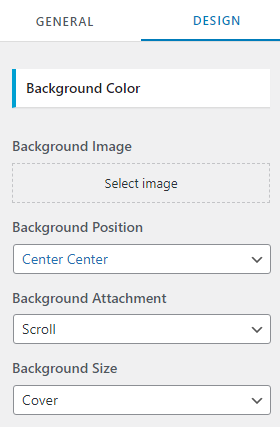
- Select Background Image, Position, attachment and Size.
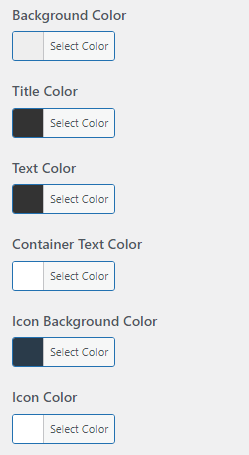
- Select Background Color, Title color, Text Color, Icon Background Color and Icon color.
Our Services
Note : if this plugin Inpersttion For Theme must be installed then this Our Services Section use Otherwise this Our Services Section is not work.
Step 1. Go to Dashboard >> Appearance >> customize >> Theme Option >> Our Services
- Select General Option and Design Option.
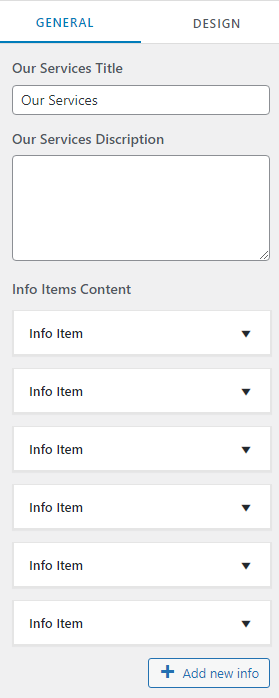
- Add Our Services Title and Discription.
- Add New Item Services and Delete Item Services.
- This Section is Draggable.
- Select Icon, Title, Description and Link.
NOTE : Free Version in No. of section Maximum 3 and Pro Version in Multiple No. of Section.
- Select Background Image, Position, Attachment and Size.
- Select Background Color and Text Color.
- Select Link Color, Link Hover Color.
- Select Contain Background Color, Text Color, Background Hover Color.
- Select Icon Color, Icon Hover Color and Contain Text Hover Color.
Our Team
Note : if this plugin Inpersttion For Theme must be installed then this Our Team Section use Otherwise this Our Team Section is not work.
Step 1. Go to Dashboard >> Appearance >> customize >> Theme Option >> Our Team
- Select General Option and Design Option.
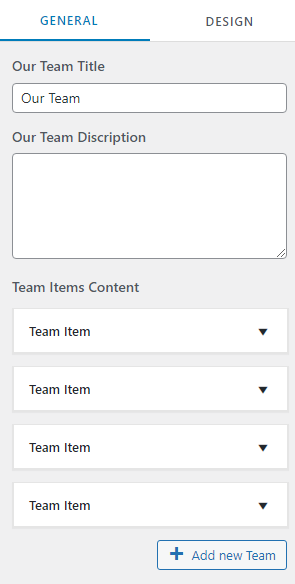
- Add Our Team Title and Description.
- Add New Item Content and Delete Item Content
- Team Item in Select Image URL, Title, Subtitle, Link.
- Add Twitter Link, Facebook Link, Instagram Link, Linkedin Link.
NOTE : Free Version in No. of section Maximum 4 and Pro Version in Multiple No. of Section.

- Select Background Image, Position, Attachment and Size.
- Select Background color, Text Color.
- Select Icon Background Color, Background Hover Color.
- Select Icon Color and Icon Hover Color.
- Select Link Color and Link Hover Color.
- Select Contain Background Color and Text Color.
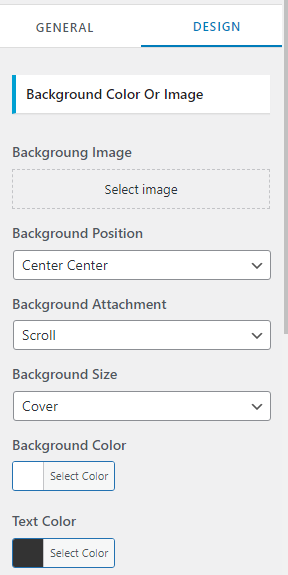

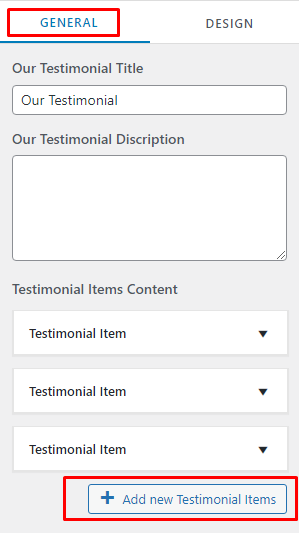
Our Testimonial
Note : if this plugin Inpersttion For Theme must be installed then this Our Testimonial Section use Otherwise this Our Testimonial Section is not work.
Step 1. Go to Dashboard >> Appearance >> customize >> Theme Option >> Our Testimonial
- Select General Option and Design Option.
- Select Our Testimonial Title and Discription.
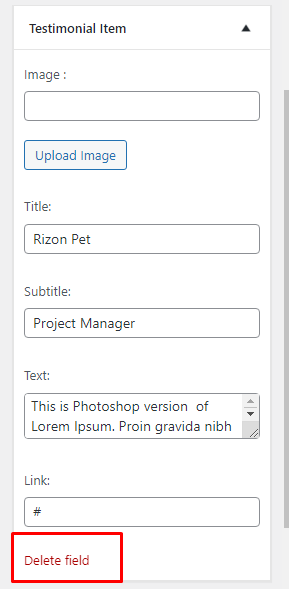
- Add New Testimonial Item and Delete Testimonial Item.
- This Section is Draggable.
- Testimonial Itam Select Image URL, Title, Subtitle, Description and Link.
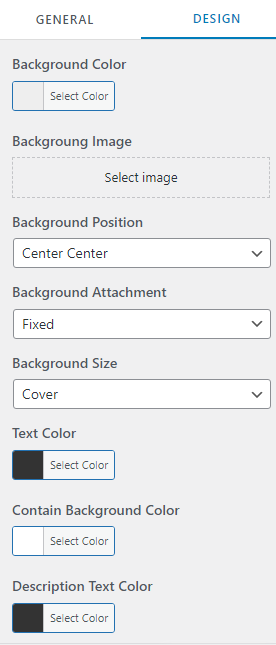
- Select Background Color, Text Color.
- Select Image, Position, Attachment and Size.
- Select Contain Background Color, Description Text Color.
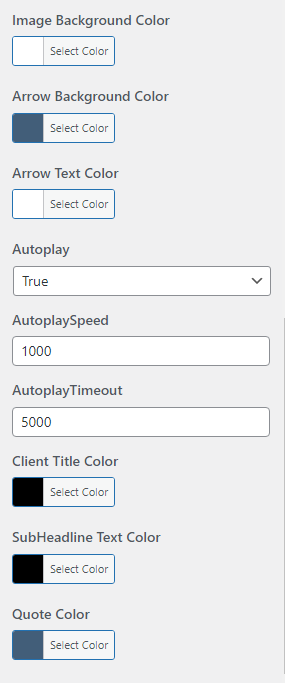
- Select Arrow Background Color, Text Color.
- Select Autoplay , Autoplay Speed, and Autoplay Timeout.
- Select Client Title Color, Subheadline Text color and Quote Color.
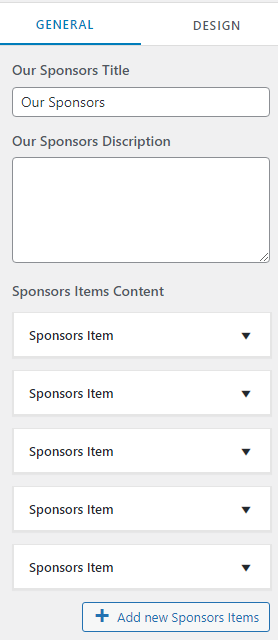
Our Sponsors
Note : if this plugin Inpersttion For Theme must be installed then this Our Sponsors Section use Otherwise this Our Sponsors Section is not work.
Step 1. Go to Dashboard >> Appearance >> customize >> Theme Option >> Our Sponsors
- Select General Option and Design Option.
- Select Our Sponsors Title, Our Sponsors Description.
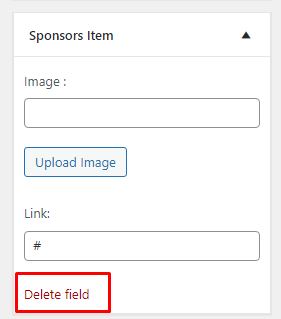
- Add New Item Sponsors and Delete Item Sponsors.
- Add Sponsor Item Image URL and Link.
NOTE : Free Version in No. of section Maximum 5 and Pro Version in Multiple No. of Section.
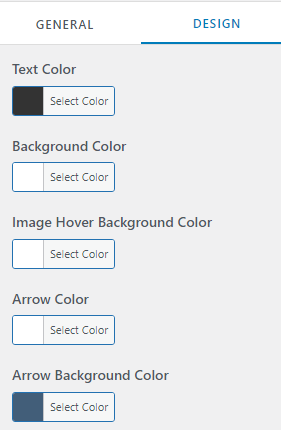
- Select Text Color, Background color, Image Hover Background color.
- Select Arrow color and Background Color.
- Select Autoplay, AutoplaySpeed and Autoplay Timeout.
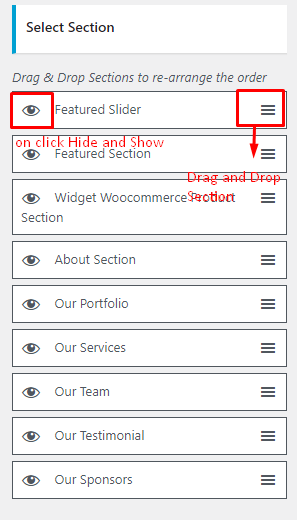
Home Page Ordering Section
Step 1. Go to Dashboard >> Appearance >> customize >> Theme Option >> Home Page Ordering Section
- Drag & Drop Section and Hide Section in home page
NOTE : Free Version in only hide & show section and Pro Version in Hide & show and Drag & drop Section.
Footer
Step1. Go to Dashboard >> Appearance >> customize >> Footer >> Footer Option.
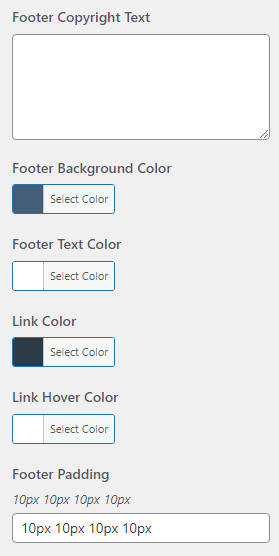
- Add Footer Text
- Select Footer Background Color and Text Color.
- Select Footer Link Color and Link Hover Color.
- Select Background Image.
NOTE : Free Version in copyright text is not allowed and Pro Version in copyright text is allowed .
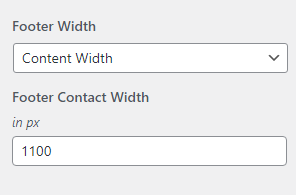
Step 2. Go to Dashboard >> Appearance >> customize >> Footer >> Footer Width.
- Select Footer Width Layout in Content width and Full Width.
- Select Content Width .
How to Change Color of the Theme?
Step1. Go to Dashboard >> Appearance >> customize >> Colors.
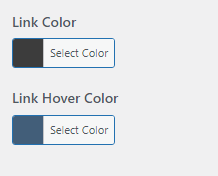
- Select Link Color and Link Hover Color.
How to Theme All Section in single Post and Page?
Note : if this plugin Inpersttion For Theme must be installed then this Shortcode use Otherwise this Shortcode is not work.
Step 1. Single Post and Page in add Shortcode.
- [theme_section section=’IFT_featured_slider_activate’]
- [theme_section section=’IFT_featured_section_info_activate’]
- [theme_section section=’IFT_about_section_activate’]
- [theme_section section=’IFT_our_portfolio_section_activate’]
- [theme_section section=’IFT_our_services_activate’]
- [theme_section section=’IFT_our_sponsors_activate’]
- [theme_section section=’IFT_our_team_activate’]
- [theme_section section=’IFT_our_testimonial_activate’]
- [theme_section section=’IFT_woocommerce_product_section_activate’]
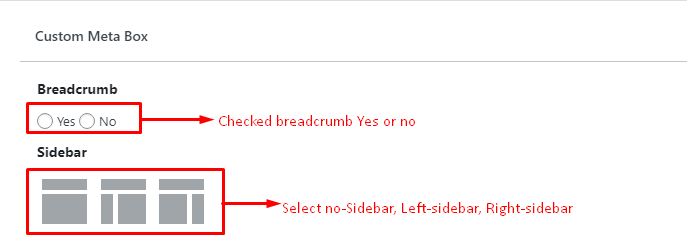
Step 2. Single Page and Post in add Breadcrumb and Sidebar.
- Single Post and Page in Breadcrumb Option Yes or no.
- Single Post and Page in Select Sidebar.
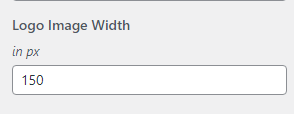
Header Image Logo Width
Step1. Go to Dashboard >> Appearance >> customize >> Site Identity.
- Add Logo Image Width in px.